We are on twitter now! "follow" us? but not in a bush like you usually do, follow us on twitter!
link:
Follow @Just_shy_of
Wednesday, March 28, 2012

Tuesday, March 27, 2012
my first machine lover!
 |
| HARDAC or Espresso Machine. |
art student barista will be wondering why your aren't shuffling half awake into their cafe every morning, instead they'll see you skipping to work with self satisfaction written all over your face. Before this post turns into a Cialis commercial lets jump right into the review SHALL we....
The machine itself looks like a modern day milkshake maker, or HARDAC from batman the animate series. Or to put it another way, Nespresso offers a modern take on the traditional espresso machine, feature art deco elements of strong lateral lines, and symmetrical design. Overall, The Nespresso's simplistic and statement piece style begs that this appliance be on the counter top, not hidden away in your pantry.
 |
| Espresso Machine or HARDAC |
 |
| ohh baby, come to papa! CREME, CHECK! |
What makes Nespresso Machines so great is that you aren't limited to just espresso, you can make any milk based drinks as well. Nespresso's Milk Frother is where the ingeniousness and practicality of the machine shines. You basically fill the milk up to either the cappuccino or latte line put the frother on the docking plate and press a button. Nespresso literally couldn't have made it easier. The thickness and consistency of milk foam is soooo good, I have yet to have a human mimic it.
 |
| Machines 1 Humans 0 |
Look
at THIS(to the left)........a REAL cappuccino. Traditional cappicinio's are supposed to be 1/3 foam, 1/3 milk, 1/3 espresso.... don't dare try and compare at your neighborhood cafe, I rarely ever get a real one, but don't blame your barista, he/she's only human.
Nespresso's capsules are only good for Nespresso machines, and your can't use any other coffee if your Nespresso machines, they say so "they can control the quality". Their coffees are rated on a scale system of 1-10, 10 being the most intense (in my opinion, the best) and 1 for you light weights. Nespresso also offers single origin coffee as well as their own version of fair trade. And before you eco bunny's get all flustered, the capsules are fully recyclable!
I do have some criticisms, even though the milk frother creates amazingly good foam, it does however lack in heating the milk to a temperature that I'd like. I'll wish upon a lucky start that one day Nespresso will incorporate a way in which you can regulate the milk temp.
Another interesting lil qwark, is once you buy a Nespresso machine, you are indoctrinated (is this the right word usage) into a NESPRESSO CLUB! what that meas is if you are ever in The Bay in downtown Vancouver and feel like a coffee, you can go to their Nespresso cafe and have a FREE COFFEE...that's right free coffee.... ANYTIME! pinch me! nothing beats a caffeine fueled spending spree if you ask me. I'm not sure if I can praise this machine enough, and if your still not convinced, see below photo.. YUM!
 |
| you know you want this! |

Tuesday, January 24, 2012
Brownies.... YES..... Cheesecake.... YES.... BLISS....NO DOUBT ABOUT IT
 |
| This amount of chocolate makes my camera go blurry |
spring form pan away,
excuse me while I go get
another piece.
Brownie Layer
 |
| BUDDA |
- 1 Cup of Unsalted Butter
- 1 Cup Cocoa Powder
- 1 3/4 Cup of Sugar
- 4 Large Eggs at room temp.
- 2 Teaspoons of Vanilla
- 1 1/4 Cup of of All Purpose Flour
- 1 Teaspoon Fine Salt
- 1/2 Cup White Chocolate Chips

- First off, pre heat oven to 350. Grease and line a spring form pan and set aside. Melt the butter into a large bowl, then sift the cocoa into the butter, Stir to combine.
- Get cracking and add eggs to mixture, blending well after each addition. Stir in vanilla and.
- Go on, go get another bowl and , combine flour, baking powder and salt and sugar(do not sift). Add to cocoa mixture and blend.
- Stir in Chocolate chips ( I used white chocolate baking discs).
- Bake for 35 mins and let cool completely before add the Cheesecake Layer.
Cheesecake Layer

- 6 oz semi-sweet chocolate, chopped
- 8 oz pkg of cream cheese, at room temperature.
- 1/2 Cup of sugar
- 1 1/2 Cup of whipping cream
- 2 oz. of White Chocolate chips, melted
- Melt the semi-sweet chocolate in doubt boiler (or some other manifestation that works for you), when melted, remove the chocolate from heat.
- In your trusty stand up mixer (on high) beat the cream cheese until very light and fluffy.
- Slowly add the sugar and vanilla to the cream cheese mix
- Add the Whipping cream and beat until soft peaks form.
- Mix the melted chocolate into the cream cheese mixture and pour over your now cooled brownie bottom.
- Chilli for at least two hours (I did one hour in freeze, one hour in fridge)

7. Free yourself from the shackles of your new years resolutions and enjoy this treat!
Sunday, January 8, 2012
Limes are not just for garnishing your favorite G&T's

Since it's my last weekend before school starts again for another semester, I thought I defiantly deserved a reward for my assumed hard work. I was initially thinking chocolate, thick and gewy... but there's something depressing about Chocolate, it always mysteriously disappears (into my stomach in the middle of the night). Since I'm currently dreading the grind, I thought a nice uplifting sunny dessert will do just fine (holla that rhymes). Whats more bright and happy than Key Lime Pie. You can't help but smile when you think of that tangy, sweet treat, and good news, its relatively easy!

For the CRUST:
- 1 1/2 Cups of crushed Graham Crackers
- 1/4 Cup of Sugar ( I used 1/8 cup and it was fine)
- 6 Tablespoons of Melted Butter
-Combine Graham Crackers, Sugar and Butter in a bowl. Press combined ingredents into a nine inch baking pan. Bake for 10 mins. and allow to fully cool.
 For the FILLING:
- 6 Extra Large Egg Yolks, at room temperature *
- 1/4 Cup of Sugar
- 1 14 oz. can of Sweetened Condensed Milk (this was pretty sweet, and the pie turned out on the sweet side, so I might use Unsweetened next time.
- 2 Tablespoons of grated Lime Zest
- 3/4 Cup of freshly squeezed Lime Juice
*If your like me and never remebers to take out the eggs before baking, here is a trick, submerge the eggs in warm water for 15 minutes, this will bring your eggs to room temperature (better than waiting 30 mins for eggs to come to room temp straight from the fridge.)
- Beat egg yolks and sugar on high speed in the bowl of an electric mixer fitted with the paddle attachment for 5 mins.
- Turn the mixer on to medium and add the remaining ingredients.
- Add filling to the pre baked pie shell.
 For the TOPPING:
- 1 Cup of cold Heavy Cream
- 1/4 Cup of Sugar
- 1/2 Teaspoon of Pure Vanilla Extract
- Thin Lime Wedges (for decoration.)
- Place the Heavy Cream in the stand up mixer with the whisk attachment. Process on high until soft peaks begin to form.
- Add sugar and Vanilla and power whisk on high until steep peaks form.
 |
| enjoy! |
Friday, January 6, 2012
Popeye don't preach, I'm in Spinach, DEEP
Hope everyone had a great holiday seasons, and is slowly getting back to normal. I, like millions around the world have made a resolution to eat healthier,so I thought I should take inspiration from the Mediterranean. Tonight I made Spinach Pie, Humus (Which I'm still eating), and Pitas (SHHH....that I bought). Both of these recipes are from one of the Barefoot Contessa's earlier cookbooks, the aptly named,
The Barefoot Contessa Cookbook
 |
| The Contessa offers some words of wisdom. |
Spinach Pie (Barefoot Contessa stylie)
- Three Cups of Chopped Yellow Onion
- Two Tablespoons of good Olive Oil.
- Two Teaspoons of Kosher Salt
- One and half Teaspoons of freshly ground Black Pepper
- Three (Ten ounce) frozen pkg. of Frozen Spinach, defrosted.
- Two Teaspoons of grated Nutmeg
- One Half Cup of grated Parmesan
- Three Tablespoons of Dry Bread Crumbs
- One Half Pound of Feta Cheese, cut into one half cubes
- One Half Cup of Pine Nuts
- One Quarter of melted Butter
- 6 Sheets of Phyllo Dough, defrosted.
- Pre-heat oven to 375 degrees
- In a medium pan, saute (that means cook, in case your not bilingual), the onions over medium heat until they are clear and starting to brown, allow the onions to cool slightly
 |
| blood sweat and tears |
 |
| Squeezed to death Spinach |
- Now comes the fun part, avoid the gym because your muscles will be tested (or maybe I'm just really out of shape) once the spinach is deforested enough to be pliable, squeeze the spinach until there is no excess liquid found in the spinach.
- When that is finally done add all the other ingredient and mix well.
- In a six inch butter pan, lay the first sheet of Phyllo Pastry Dough out, coat with melted butter and repeat until all six layers are used. The Phyllo Sheets will be larger, which is a good thing, allow the excess to drape over the dish.
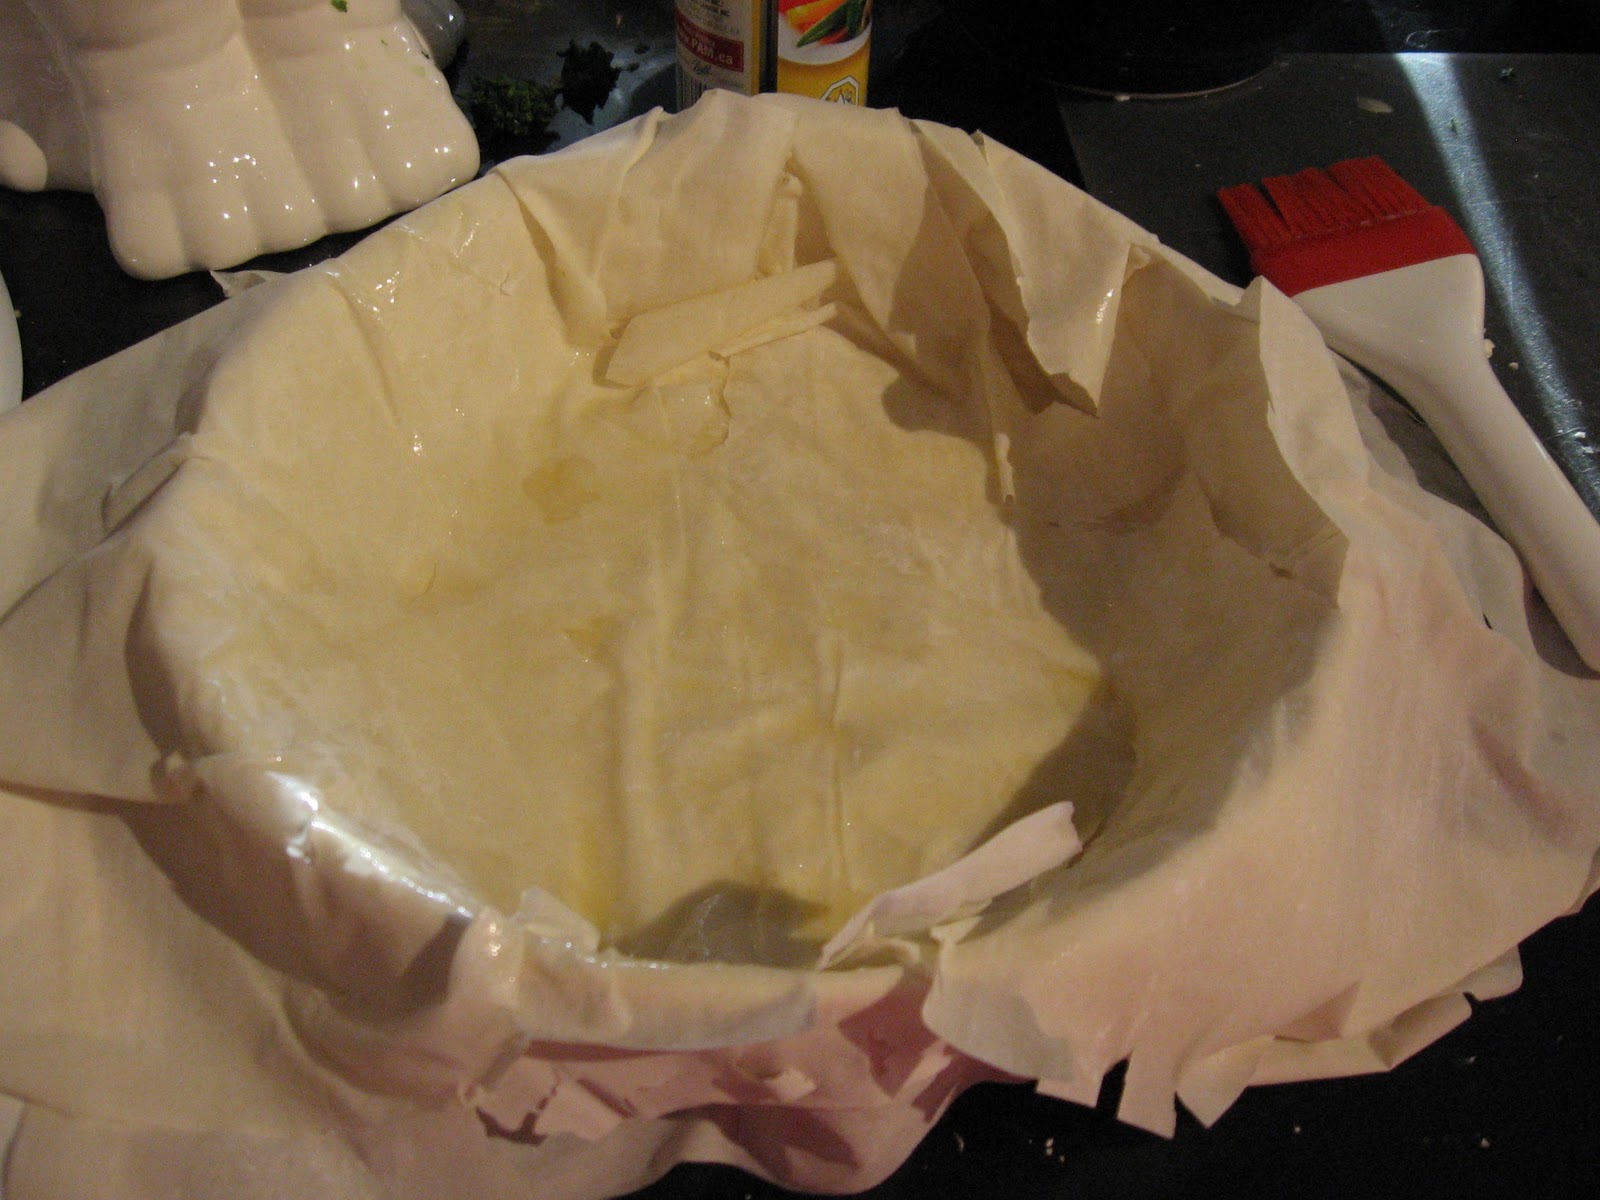

- Add the Spinach Filling and then wrap the the excess Phyllo Dough on top of the mixture.
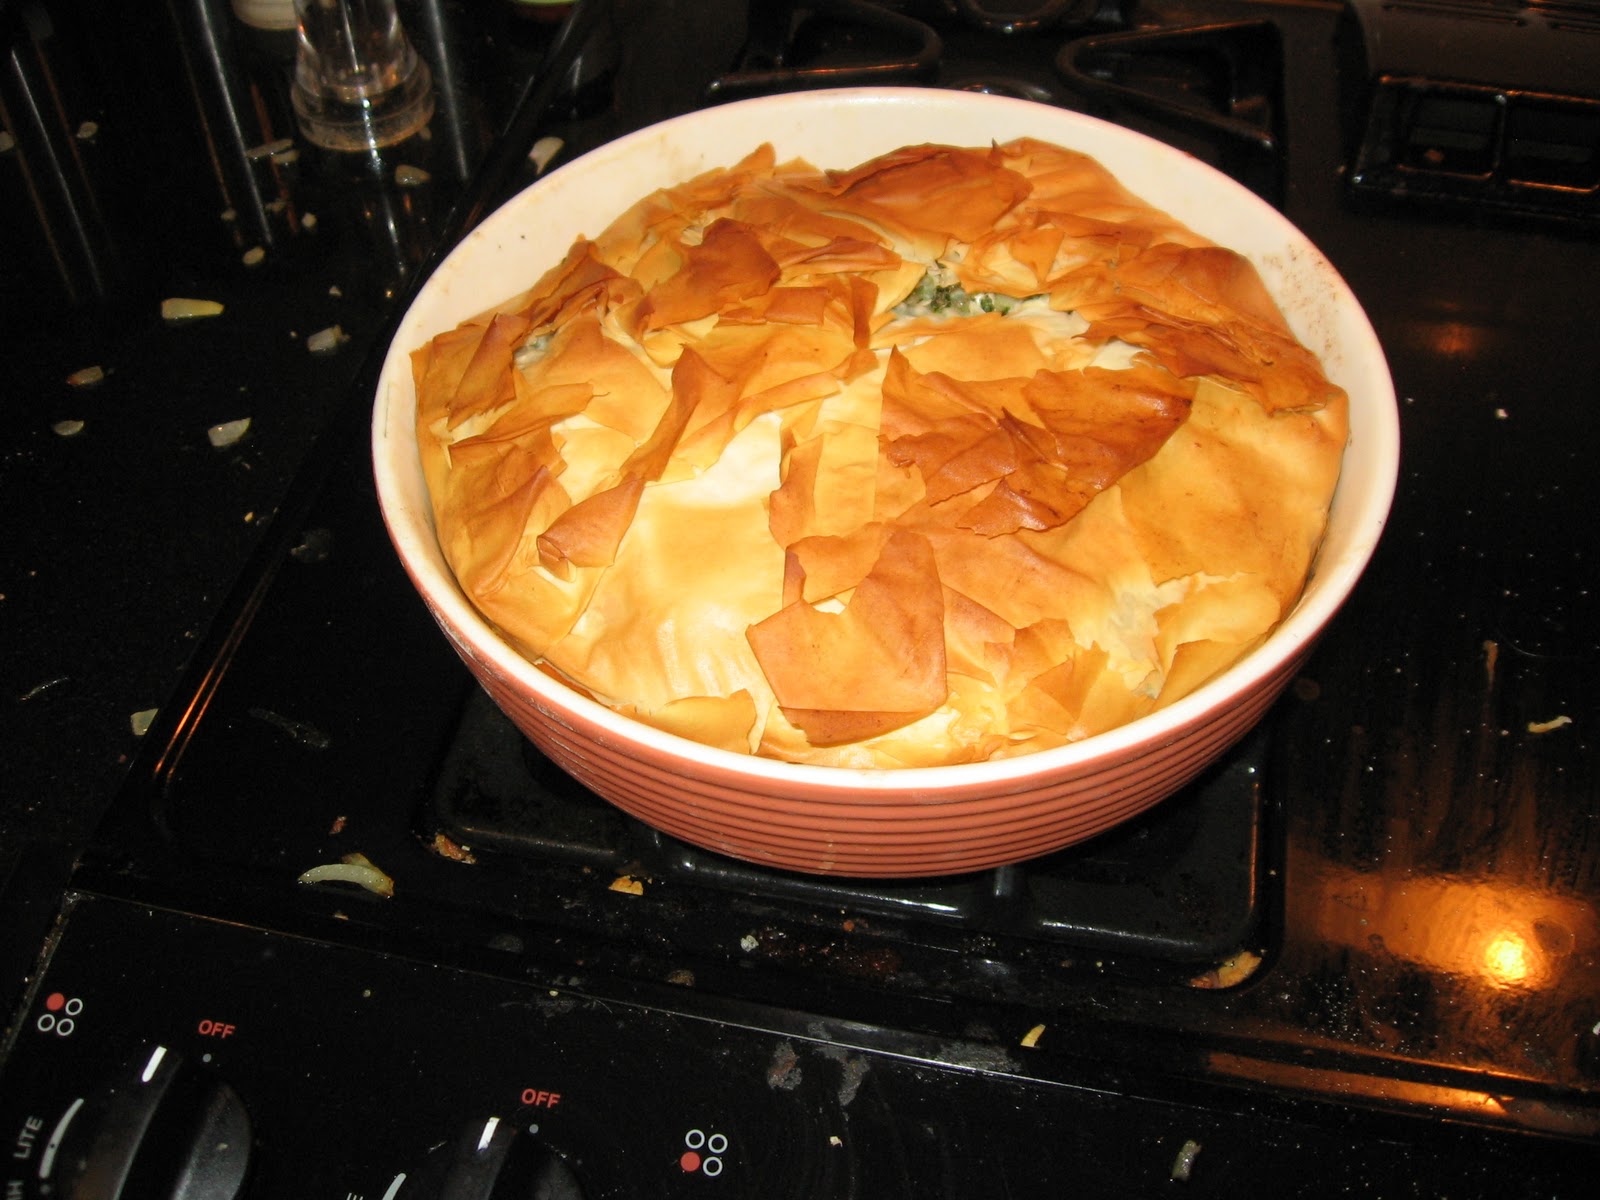
- Brush the top with butter and place in over for an hour, or until the top of the pie is golden brown.
 |
| fresh from the oven. |
Humos, Homos, Hummus I don't care how you say it, stop talking and make this now!
- Two cups of Canned Chick Peas (liquid reserved)
- One and half Teaspoons kosher salt
- 4 Garlic Cloves, minced
- One Third cup of Tahini
- Six Tablespoons of freshly squeezed lemons
- Two Tablespoons of water or reserved liquid
- 8 Dashes of Tabasco Sauce
Wishing everyone a great year, and hey, lets hope the Mayans were wrong.
Wednesday, December 21, 2011
Can a White Jewish Girl cook Chiniese? ... yes apparently.
When you think of Chinese food, Gwyneth Paltrow's glowingly bleached face doesn't necessarily come to mind, but these two recipes will challenge your assumptions about how white peoples can attempt to cook Chinese.
I have been craving Chinese (must be all the Christmas carols....that makes no sense), and because I only have one day left of my "fast read rental" from the library, I thought I'd give Gwyneth's Cook book "My Fathers Daughter" another go. This was a meal that made me look at Gwyneth's cooking and eating healthy in a new light, sometimes you can have the best of both worlds~! Enjoy.
-To make the Ms. Paltrow's Chinese Chicken is surprisingly simple.
"Best Stir Fried Chicken"

- Toss the chicken with cornstarch (flour is ok too) lots of pepper and a lil salt
"Fried Rice with Kale and Scallions"
(don't worry, its good).
-1 bushel of kale
In the week that I rented Gwyneth's book from the libaray (ghetto, holla!) I've made three different dishes. Surprisingly they've all turned out to be what I expected, made with healthy ingredents, and tasted like they were made from healthy ingredients. I did enjoy everything I made from this book, however I still felt there was something lacking. All and all I still need some more convincing to buy the book, but for the time being, I might just keep re-signing it out from the library every once and a while.
Hope everyone has a great Christmas season.
I have been craving Chinese (must be all the Christmas carols....that makes no sense), and because I only have one day left of my "fast read rental" from the library, I thought I'd give Gwyneth's Cook book "My Fathers Daughter" another go. This was a meal that made me look at Gwyneth's cooking and eating healthy in a new light, sometimes you can have the best of both worlds~! Enjoy.
-To make the Ms. Paltrow's Chinese Chicken is surprisingly simple.
 |
| rent me again! |
-4 boneless chicken brests
- 2 tbsp. cornstarch
-coarse salt-
-2 tbsp of vegetable oil.
-1/4 cup of minced ginger
-1/4 cup of minced garlic
-1/2 cup of scallions
-pinch red chilli flakes
-1/2 cup of rice wine vinegar
1/2 cup brown sugar
-2 tbsp soy sauce
-two tablespoons of cilantro
-two tablespoons of cilantro

- Toss the chicken with cornstarch (flour is ok too) lots of pepper and a lil salt
-Heat oil in a non sick wok over medium high heat.
-add garlic and ginger (chilli flakes if using) and cook for one minunte
-Add coated chicken and cook for 5mins
-Add vinegar, sugar and 5 or 6 grinds of pepper
-Boil on high for three mins. This will carmalize the sugar and will result in sticky and sweet sauce
-Add the soy sauce and cook for another thrity seconds, serve with spinkled cliantro ENJOY!
 |
| Kale makes another unlikely appearance in my kitchen. |
"Fried Rice with Kale and Scallions"
(don't worry, its good).
-1 bushel of kale
-1 1/2 Tbsp. vegetable oil
-2 cloves of Garlic (i used four, only because I'm afraid of impended Vampire attacks)
-3 large scallions, cut into 1/8th diagonal slices (this is Gwyenth's pompous direction)
-2 1/2 cups of cooked brown rice (don't worry, you can't taste brown rice)
-1 table spoon, plus 1 teasponn of soy sauce.
 | |
| Mash it all together |
-Cut Kale into ribbons (or as Gwyneth would say.....chiffonade,) and steam for 7mins
-Heat oil in medium heat , add garlic and cook stirring for 2 mins.
-Raise the heat to meduime and add the steamed kale and scallions.
-Cook for 2mins then add the rice, cook for another 2 mins
-Add soy sauce and cook for 30 sec,
Enjoy!
 |
| Dramatic Mood Lighting! |
In the week that I rented Gwyneth's book from the libaray (ghetto, holla!) I've made three different dishes. Surprisingly they've all turned out to be what I expected, made with healthy ingredents, and tasted like they were made from healthy ingredients. I did enjoy everything I made from this book, however I still felt there was something lacking. All and all I still need some more convincing to buy the book, but for the time being, I might just keep re-signing it out from the library every once and a while.
Hope everyone has a great Christmas season.
Thursday, December 15, 2011
I've never met a dessert I didn't like.
Creme Brulee and I have LOTS of things in common, We both have an understated elegance, and are not optimized to our true potential (le sigh). Having said that, Creme Brulee is soooo easy (we don't have that in common) and tastes soooo good (another commonality). This would be a perfect holiday indulgence, and can be made up to three days in advance, great if you know your going to be running out of time.
Heres what you need:

Grand Mariner, yes please.
Here's the reciepe I used, from the love lorned Barefoot Contessa herself, Ina Gartens book, Barefoot in Paris.
-one large egg
-4 extra large egg yoke
-1/2 cup of sugar, plus 1 tbsp for each serving
-3 cups of heavy cream ((yum)( in Canada we use whipping cream eh))
-1 teaspoon of vanilla extract, (i used 1 tbsp)
-1 Tbsp of Grand Marnier (plus one shot for the chef, zing zing!)
- NOTE: before you start mixing, put one pot of water to boil on the stove, as well as a pot with your heavy cream and bring to scalding temperature, don't boil the cream.
- NOTE: Pre-heat oven to 300 Degrees
-once the whipping cream is close to a scaulding temperature, add the whipping cream to the egg and sugar mixture.

Mixing at a breakneck speed (mix just to combine tho)
-With the mixer still on slow, add the vanilla and grand mariner, fill the ramekins till almost filled.
-chef at this point should administer the grand mariner shot to him/herself.

cook towards the light.....
-Add the boiling water to the baking pan and plop the filled ramekins into the newly created water bath.
- NOTE: Make sure the water is filled to half the height of the ramekins.
-Place the water bath and ramekins in the oven and bake for 40 mins. (check after 40 mins. to see if they have set)
-Let cool on countertop to room temperature, then put in fridge to cool completely.
 |
| how can something so beautiful, be so under used? |
-If your feeling extra festive, sprinkle 1 tbsp of sugar on each of the ramekin and heat with a kitchen blowtorch (a candle lighter does not work, trust me!) If anyone wants to buy me a kitchen blowtorch this holiday season, I would gladly make this dessert for them in full, however I didn't add the sugar to the top, but the custard portion was still really really good.
Subscribe to:
Posts (Atom)