Sunday, November 18, 2012

Pie. (no explaination is needed).


 I originally wanted to have this post up for Canadian Thanksgiving, well, clearly that didn't happen, so we'll hopefully have this post up for the American Thanksgiving!  What says Thanksgiving more than pies and since this was my first attempt at a pie crust what a perfect opportunity to immortalize my attempts; all credit is given to Anna Olsen for her following recipes.


This crust is super easy, now you have no excuse not to make your own crust.... sorry.

Two-Crust Pie Dough

2 1/4 cups cake and pastry flour
2 tablespoons sugar
3/4 teaspoon salt
1 cup cold, unsalted butter, cut into pieces
6 tablespoons cold water
1 tablespoon lemon juice or white vinegar

1. Stir the flour, sugar and salt to combine in a bowl or using a stand mixer fitted with the paddle attachment. 
  • Cut in the butter by hand with a pastry cutter or on low speed until just small pieces of butter are visible and the mixture as a whole just begins to take on a pale yellow colour (indicating that the butter has been worked in sufficiently).

2. Stir the water and lemon juice together and add this to the dough all at once, mixing until the dough just comes together.
  •  Shape the dough into 2 discs, wrap and chill for at least 2 hours before rolling. Alternatively, the dough can be frozen for up to 3 months and thawed in the fridge before rolling.

3. Shape into 2 logs and chill.
Apple Cinnamon Galettes
1/2 cup sour cream
2 Tbsp + 1/2 cup dark brown sugar or demerara sugar
1/2 teaspoon vanilla extract
4 cups peeled and thinly sliced Granny Smith, Cortland, or other tart apple (about 3 apples)
1 teaspoon ground cinnamon
6 teaspoons unsalted butter
1 egg, whisked with 2 tbsp water, for brushing
                                                                                                        Turbinado sugar, for sprinklin'


1. Preheat the oven to 375 F and line 2 baking trays with parchment paper. Pull the pie dough from the fridge 20 minutes before rolling.
 

2. Slice each log into 3 pieces and roll each piece out on a lightly floured work surface to just under ¼-inch thickness and 8-inches across. Place 3 onto each baking tray and chill while preparing the filling.
 

3. Stir the sour cream, 2 Tbsp of brown sugar and vanilla together. In another bowl, toss the apples, remaining ½ cup of brown sugar and cinnamon together.
 

4. Spoon the sour cream into the centre of each rolled piece of dough and top with the sliced apples. Place a teaspoon of butter on the top of each tart. Fold the dough over the apples, making 5 or 6 creases overlapping each other so that the apples are almost fully covered. Brush the pastry with the eggwash and sprinkle generously with granulated sugar.
 

5. Bake the galettes for about 25 minutes, until the pastry is a rich golden brown colour. Let the galettes cool for at least 20 minutes before serving warm, or cool completely and serve at room temperature.
 

YUM!
The galettes should be served warm or at room temperature, but can be stored chilled for up to 3 days.

Happy Thanksgiving


Wednesday, October 3, 2012

Black Bottom (Portion Controlled) Cupped Cakes!


One of the reasons why I love cupcakes is because of their predetermined portion size.  One cupcake seems easier to eat that one piece (usually of varying sizing), of cake.  So before you commit yourself to just one of these little guys, reward yourself with a self realization that after you eat the inevitable second or third cupcake, you're probably still not eating as much as you would, if you were eating a piece of cake. . . its all about perspective.

                      
Heres what YOU (not me) will need: 
Black Bottom Cupcakes

1 - 8 oz. Package Cream Cheese, Softened.
 
1 - egg, slightly beaten
 
1/3 Cup Sugar
 
Pinch of Salt
 
1 - 6 oz. Package Chocolate Chips
 
1 Cup of Sugar
 
1 ½ Cups Flour
 
1/4 Cup Cocoa
 
1 Tsp. Baking Soda
 
½ Tsp. Salt
 
1 Cup Water
 
½ Cup Oil
 
1 Tbsp. Vinegar (weird I know, but trust me)
1 Tsp. Vanilla

Method
    • In a small bowl combine first four ingredients.
    • Add chocolate chips and set aside.
    • Mix remaining ingredients well.
    • Fill muffin tins, lined with paper cups (large), 1/3 to ½ full with this mixture.
    • Drop a large spoonful of cheese mixture on top.
    • Bake 20 to 25 minutes at 350 degrees F (180 degrees C)   
    •  Yields 20 cupcakes. 
    •  
       
    Cream together the cream cheese, sugar, beaten egg and a pinch of salt

    mix your dry ingredents


    fill the cupcake holds to 1/2 mark, this makes great portions... cuz I'm very concerned with portion control.
       
    plop the cream cheese, chocolate chip mixture into the middle of the previous layer.
       
    . . . 18 . . . 17. . . get them while you can!
       

Saturday, August 11, 2012

Terrariums. . . I mean plant holds

   TERRARIUMS!  No this is not some sort of spider cage *shudder*, true the even the word terrariums reminds me too much of word tarantula so lets call this weekend project.....plant holds...yes...they'll do nicely.


Here's what you need for your "plant hold;"
  • stones-jaged ones work best
  • sand
  •  charcoal
  • cactus soil
  • succulents plants, the amount depends on the size of your container. THANKS CAPTAIN OBVIOUS 
  • large bowl
  • curious puppy


1. Fill your jug or glass container with your first layer-jagged stone. Since the glass container has no drainage, these rocks will provide drainage for your plants.


 2.  Your next layer is Charcoal, the ladies at the nursery said to liberally dump this in...so dump it!  The charcoal will help eliminate any musty odors. 

 3.  Aren't you glad that you live near many beaches, because the next layer is sand.  If you do get your sand from the beach, your apparently supposed to bake your sand in the oven for a bit.
(yes i bought sand)

 4.  NEXT add your cactus soil.  The soil provides great drainage, and that's what makes your succulent plants happy.

5.  Now place your design cap on and start placing your succulent plants.  A good tip is to put the biggest plant in the middle, and then balance the larger succulent by putting small plants around it.

CAUTION....Plant holds sometimes attract apparition.
 6. Add some polished rocks and HOT DAM!  its done.   I've seen these is stores for up to 250.00, but with everything, my Ter.. er ... Plant Hold cost $ 50.00


HOPE YOUR HAVING A NICE WEEKEND.

Friday, August 3, 2012

Smooth Criminal!

Just as Batman has risen this summer, so has my BLOG.

    After yesterday's inability to function because I was so tired, I thought I'd step up my push and shove relationship to coffee and try something different. I combined my morning smoothy with my morning coffee, but technically doesn't count as my one coffee a day rule...mwhahahah, take that self regulating rules.

Taken from "refresh" 

Rocket Fuel Espresso Shake. Here's what you'll need to take off....3..2...1.....

 - 1 dbl shot of espresso, or strong coffee

 - 6 oz or 3/4 Cup. vanilla Almond milk * recipe calls for soy milk, but if you concerned            about  growing soy based hormonal additions   *cough cough*, almond milk works jusssst fine.

 - 1 B-A-N-A-N-A, peeled *put of hollerback girl and continue to bang this smoothy out.

 - 1 tsp. of Maple Syrup

 - 1 shake, shake of cinnamon

- 6 ice cubes, plus one for Watson

What I did, and what the recipe tells you to do, are two different things, my way is easier


 - Throw the banana and milk together, blended it until smooth. I then added the espresso, maple syrup and cinnamon.
 I followed up with the ice cubes (this is when it goes side ways), I only have a hand blender so the ice cubes where noticeable, if you had a fancy blender it would  work better. All and all it was good and a nice kick start to the day of packing


stay cool this weekend! eat lots of ice cubes

Have a great long weekend!

Wednesday, March 28, 2012

MID-LIFE CRSIS ALERT.....

We are on twitter now!  "follow" us?  but not in a bush like you usually do,  follow us on twitter!
link:

Tuesday, March 27, 2012

my first machine lover!

HARDAC or Espresso Machine.
Is it possible to love metal and plastic?  If you would have asked me two weeks ago I probably would have said no, but NOW...yes yes yes, a thousand times yes!  Nespresso and their little coffee capsules of joy will change your life and your relationship with your local barista.  Soon that angst ridden
 art student barista will be wondering why your aren't shuffling half awake into their cafe every morning, instead they'll see you skipping to work with self satisfaction written all over your face.  Before this post turns into a  Cialis commercial lets jump right into the review SHALL we....

The machine itself looks like a modern day milkshake maker, or  HARDAC from batman the animate series. Or to put it another way,  Nespresso offers a modern take on the traditional espresso machine, feature art deco elements of strong lateral lines, and symmetrical design.  Overall, The Nespresso's simplistic and statement piece style begs that this appliance be on the counter top, not hidden away in your pantry. 

Espresso Machine or HARDAC
 The basic principal of Nespresso is easy, great coffee, and it definitely delivers.   Like so many coffee machines of today (and the future), Nespresso works from model of single serving capsules, but instead of delivering coffee, Nespresso perfectly dispenses espresso, HOW EUROPEAN!   That's just it, Nespresso have been in Europe for over 30 years (totally made that up) and is finally breaking into the mainstream in North America. 


ohh baby, come to papa! CREME, CHECK!

What makes Nespresso Machines so great is that you aren't limited to just espresso, you can make any milk based drinks as well.  Nespresso's Milk Frother is where the ingeniousness and practicality of the machine shines. You basically fill the milk up to either the cappuccino or latte line put the frother on the docking plate and press a button.  Nespresso literally couldn't have made it easier.   The thickness and consistency of milk foam is soooo good, I have yet to have a human mimic it.
Machines 1  Humans 0


Look
 at THIS(to the left)........a REAL cappuccino.  Traditional cappicinio's are supposed to be 1/3 foam, 1/3 milk, 1/3 espresso.... don't dare try and compare at your neighborhood cafe, I rarely ever get a real one, but don't blame your barista, he/she's only human.

Nespresso's capsules are only good for Nespresso machines, and your can't use any other coffee if your Nespresso machines, they say so "they can control the quality".  Their coffees are rated on a scale system of 1-10, 10 being the most intense (in my opinion, the best) and 1 for you light weights.  Nespresso also offers single origin coffee as well as their own version of fair  trade. And before you eco bunny's get all flustered, the capsules are fully recyclable!

 I do have some criticisms, even though the milk frother creates amazingly good foam, it does however lack in heating the milk to a temperature that I'd like.  I'll wish upon a lucky start  that one day Nespresso will incorporate a way in which you can regulate the milk temp.

 Another interesting lil qwark, is once you buy a Nespresso machine, you are indoctrinated (is this the right word usage) into a NESPRESSO CLUB!  what that meas is if you are ever in The Bay in downtown Vancouver and feel like a coffee, you can go to their Nespresso cafe and have a FREE COFFEE...that's right free coffee....  ANYTIME!    pinch me!  nothing beats a caffeine fueled spending spree if you ask me. I'm not sure if I can praise this machine enough, and if your still not convinced, see below photo.. YUM!

you know you want this!

Tuesday, January 24, 2012

Brownies.... YES..... Cheesecake.... YES.... BLISS....NO DOUBT ABOUT IT


This amount of chocolate makes my camera go blurry
Its hard to put into words how much I love this cheesecake / brownie.  If you like Brownies, and Cheesecake doesn't it make sense to put them together in one glorious civil union? Try it before Harper decides to invalided this union!  The path to Nirvana is only a 
spring form pan away, 
excuse me while I go get 
another piece.

Brownie Layer

BUDDA
  • 1 Cup of Unsalted Butter
  • 1 Cup Cocoa Powder
  • 1 3/4 Cup of Sugar
  • 4 Large Eggs at room temp.
  • 2 Teaspoons of Vanilla
  • 1 1/4 Cup of of All Purpose Flour
  • 1 Teaspoon Fine Salt
  • 1/2 Cup White Chocolate Chips
  1. First off, pre heat oven to 350.  Grease and line a spring form pan and set aside.  Melt the butter into a large bowl, then sift the cocoa into the butter, Stir to combine.   
  2. Get cracking and add eggs to mixture, blending well after each addition. Stir in vanilla and. 
  3. Go on, go get another bowl and , combine flour, baking powder and salt  and sugar(do not sift). Add to cocoa mixture and blend.  
  4. Stir in Chocolate chips ( I used white chocolate baking discs).  
  5. Bake for 35 mins and let cool completely before add the Cheesecake Layer.


Cheesecake Layer


  • 6 oz semi-sweet chocolate, chopped
  • 8 oz pkg of cream cheese, at room temperature.
  • 1/2 Cup of sugar
  • 1 1/2 Cup of whipping cream
  • 2 oz. of White Chocolate chips, melted

    1. Melt the semi-sweet chocolate in doubt boiler (or some other manifestation that works for you), when melted, remove the chocolate from heat.
    2. In your trusty stand up mixer (on high) beat the cream cheese until very light and fluffy.
    3. Slowly add the sugar and vanilla to the cream cheese mix
    4. Add the Whipping cream and beat until soft peaks form.
    5. Mix the melted chocolate into the cream cheese mixture and pour over your now cooled brownie bottom.
    6. Chilli for at least two hours (I did one hour in freeze, one hour in fridge)  

    7. Free yourself from the shackles of your new years  resolutions and enjoy this treat!


      Sunday, January 8, 2012

      Limes are not just for garnishing your favorite G&T's


      Since it's my last weekend before school starts again for another semester, I thought I defiantly deserved a reward for my assumed hard work.  I was initially thinking chocolate, thick and gewy... but there's something depressing about Chocolate, it always mysteriously disappears (into my stomach in the middle of the night).  Since I'm currently dreading the grind, I thought a nice uplifting sunny dessert will do just fine (holla that rhymes).  Whats more bright and happy than Key Lime Pie.  You can't help but smile when you think of that tangy, sweet treat, and good news, its relatively easy!


      For the CRUST:
      • 1 1/2 Cups of crushed Graham Crackers
      • 1/4 Cup of Sugar ( I used 1/8 cup and it was fine)
      • 6 Tablespoons of Melted Butter 
      -Combine Graham Crackers, Sugar and Butter in a bowl.  Press combined ingredents into a nine inch baking pan.  Bake for 10 mins. and allow to fully cool.

      For the FILLING:
      • 6 Extra Large Egg Yolks, at room temperature *
      • 1/4 Cup of Sugar
      • 1 14 oz. can of Sweetened Condensed Milk (this was pretty sweet, and the pie turned out on the sweet side, so I might use Unsweetened next time.
      •  2 Tablespoons of grated Lime Zest
      •  3/4 Cup of freshly squeezed Lime Juice
      *If your like me and never remebers to take out the eggs before baking, here is a trick, submerge the eggs in warm water for 15 minutes, this will bring your eggs to room temperature (better than waiting 30 mins for eggs to come to room temp straight from the fridge.)

      - Beat egg yolks and sugar on high speed in the bowl of an electric mixer fitted with the paddle attachment for 5 mins.
      - Turn the mixer on to medium and add the remaining ingredients.
      - Add filling to the pre baked pie shell.


      For the TOPPING:
      •  1 Cup of cold Heavy Cream
      • 1/4 Cup of Sugar
      • 1/2 Teaspoon of Pure Vanilla Extract
      • Thin Lime Wedges (for decoration.)

      - Place the Heavy Cream in the stand up mixer  with the whisk attachment.  Process on high until soft peaks begin to form.
      - Add sugar and Vanilla and power whisk on high until steep peaks form.

      enjoy!


        Friday, January 6, 2012

        Popeye don't preach, I'm in Spinach, DEEP

        Hope everyone had a great holiday seasons, and is slowly getting back to normal.  I, like millions around the world have made a resolution to eat healthier,so I thought I should take inspiration from the Mediterranean. Tonight I made Spinach Pie, Humus (Which I'm still eating), and Pitas  (SHHH....that I bought).  Both of these recipes are from one of the Barefoot Contessa's earlier cookbooks, the aptly named,
        The Barefoot Contessa Cookbook
        The Contessa offers some words of wisdom.
        The Spinach Pie is a great way of getting a ton of healthy greens into your system, unfortunately the recipe called for frozen spinach. Frozen Spinach requires you to strangle, punish and squeeze the hell out of that poor defencelessness spinach.  If you up for this arm / muscle shaking experience, here is the recipe in all its glory:

        Spinach Pie (Barefoot Contessa stylie)

        • Three Cups of Chopped Yellow Onion
        • Two Tablespoons of good Olive Oil. 
        • Two Teaspoons of Kosher Salt
        • One and half Teaspoons of freshly ground Black Pepper
        • Three (Ten ounce) frozen pkg. of Frozen Spinach, defrosted.
        • Two Teaspoons of grated Nutmeg
        • One Half Cup of grated Parmesan
        • Three Tablespoons of Dry Bread Crumbs
        • One Half Pound of Feta Cheese, cut into one half cubes
        • One Half Cup of Pine Nuts
        • One Quarter of melted Butter
        • 6 Sheets of Phyllo Dough, defrosted. 

        - Pre-heat oven to 375 degrees
        - In a medium pan, saute (that means cook, in case your not bilingual), the onions over medium heat until they are clear and starting to brown, allow the onions to cool slightly
        blood sweat and tears
        Squeezed to death Spinach

        - Now comes the fun part, avoid the gym because your muscles will be tested (or maybe I'm just really out of shape) once the spinach is deforested enough to be pliable, squeeze the spinach until there is no excess liquid found in the spinach.

        - When that is finally done add all the other ingredient and mix well.

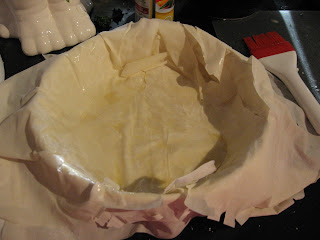
        - In a six inch butter pan, lay the first sheet of Phyllo Pastry Dough out, coat with melted butter and repeat until all six layers are used.  The Phyllo Sheets will be larger, which is a good thing, allow the excess to drape over the dish.


        - Add the Spinach Filling and then wrap the the excess Phyllo Dough on top of the mixture.
        - Brush the top with butter and place in over for an hour, or until the top of the pie is golden brown.

        fresh from the oven.
        Humos, Homos, Hummus I don't care how you say it, stop talking and make this now!

        •  Two cups of Canned Chick Peas (liquid reserved)
        • One and half Teaspoons kosher salt
        • 4 Garlic Cloves, minced
        • One Third cup of Tahini
        • Six Tablespoons of freshly squeezed lemons
        • Two Tablespoons of water or reserved liquid
        • 8 Dashes of Tabasco Sauce
        - Couldn't be easier, place all ingredients in the food processor with the fitted steel blade and process until the hummus is at the consistency you'd like.   Be warned, this is very garlicky, but i like that. 

        Wishing everyone a great year, and hey, lets hope the Mayans were wrong.